
December 22, 2017
|
8 min read
Using Vapid for Web Push Notifications in a Ruby on Rails Application
by
Lachi Agnew
Software Developer
Most modern websites are dynamic web applications that are expected to work across a myriad of devices and browsers. Since the most common way of accessing web applications nowadays is via mobile browsers, users expect the same level of interactivity they get with native apps on the web.
Some web apps are optimised for mobile to the point where the difference between native applications and web applications is next to none.
One notable exception to this was push notifications, until recently there was no way to send users of your web application notifications messages. This was until the good folks at Chrome implemented a web push feature that allowed web developers to re-engage users via notifications. Web push allows messages to be delivered to user's browsers even when they are not active on your web app. Giving developers the same level of interaction with their users as mobile developers do through push notifications.
We recently had to implement push notifications for a large commercial real estate marketplace app. A challenge with implementing this was we needed to ensure that our app can keep sending messages to multiple subscribers and allow us to see what was sent to who and when. To overcome this challenge we used the Voluntary Application Server Identification (VAPID) for Web Push.
In this post, we will go through how to implement web push functionality in a Ruby on Rails project using VAPID.
To get Web Push working you’ll need:
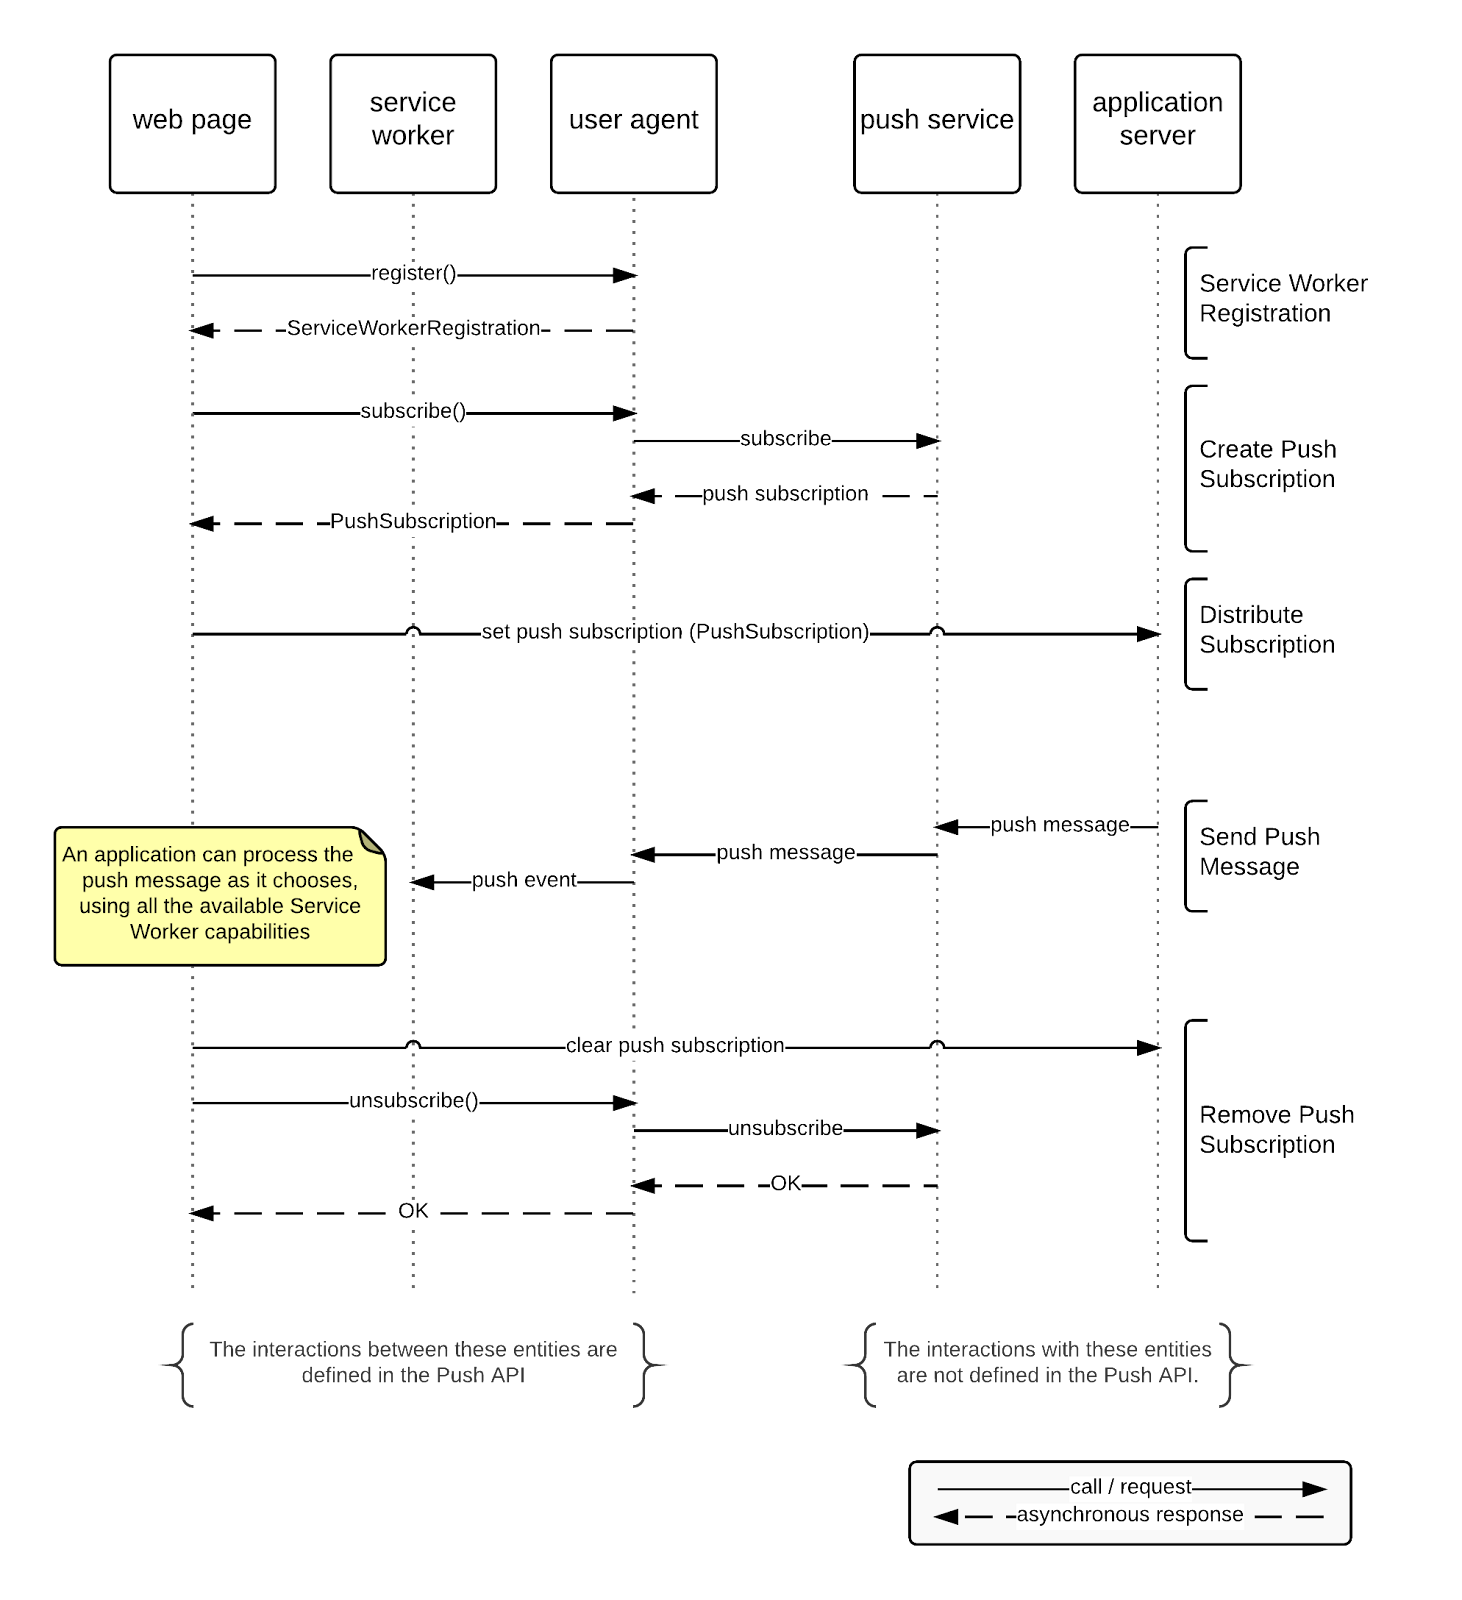
The diagram below gives a good outline of how it all works

You can use this Git Repository to follow along or set up a new rails app and implement as you read.
There are a few things you will need to set up before you start sending messages.
Go into the project root and install the web push gem
This gem is used for the push of the data itself, it deals with all the encryption and requests
<p>CODE: https://gist.github.com/lachlanagnew/cb2ba9513b63f195bb59ce8cb6c8700c.js</p>
Serviceworkers-rails is a gem that allows a rails server to serve out a service-worker.js file making it look like it’s from the root directory.
A serviceworker is a bit of javascript that is always running in the background of the browser even if the page isn’t open.They have many useful applications apart from listening for push notifications like offline loading and periodic background syncs. To learn more about service workers you can read up here - https://developers.google.com/web/fundamentals/primers/service-workers/
Setting up your VAPID keys gives your server a unique signature to sign the messages send out over the subscription.
Open up your ruby console and do the following:
<p>CODE: https://gist.github.com/lachlanagnew/8008a0cc5ccc3011719019f958b95e83.js</p>
VAPID is a protocol used for secure data transfer, you can read up more about it in the spec. You will want to store these keys in a secure location for future use.
The manifest.json is used to pass settings to the browser on the server that is sending push notifications.
<p>CODE: https://gist.github.com/lachlanagnew/a5c2169c41e921414deb9f3160d1171d.js</p>
And link that in the head tag of your application:
<p>CODE: https://gist.github.com/lachlanagnew/dddc600e2b0eb73ffbc70327714c97f7.js</p>
Set up Service worker:
Install service worker files,
<p>CODE: https://gist.github.com/lachlanagnew/d5311b1ca46d714678d1abbdb304e992.js</p>
Then you declare all the files you wish to be included with the service worker
<p>CODE: https://gist.github.com/lachlanagnew/ba462f4f9122033d085e24cf15aa081d.js</p>
This declares which files will be served and referenced like they are coming from the root directory, so any file that the service worker references will need to be declared here.
Setting up the ServiceWorker:
Set up the service worker to listen to a push:
<p>CODE: https://gist.github.com/lachlanagnew/9386c0151d3ce486cdf008d97f6451a9.js</p>
Get subscription:
To allow the server to send a push to you, you must first be subscribed to the VAPID public key.
<p>CODE: https://gist.github.com/lachlanagnew/30759d6d1936c80875ab9a8a334816fa.js</p>
This does a lot so let's break it down;
Once the data is sent to the server you should save what you received from your user's data table, this will allow you to send a notification out to a particular user.
Send push:
Finally, now you have all of the data necessary, you can send out a message to your client.
<p>CODE: https://gist.github.com/lachlanagnew/4baa96de9df0233e7b298aedb166d0ab.js</p>
With the subscription details saved under your user's data table, you can send out a push notification to that user using the web push gem as shown above. You should then see a notification get triggered.
You can access a Rails Web Push demo project via our Github. The README in the repository has details on how to run this service.
Further reading about push notifications:
https://web-push-book.gauntface.com/
https://rossta.net/blog/using-the-web-push-api-with-vapid.html
https://tools.ietf.org/html/draft-ietf-webpush-protocol-12
If you encounter any issues drop us a line in the comments below.

Want some help growing your business and creating products/service that your customers will love on Ruby on Rails? Drop us a line or click on the floating head to chat with us.


